flexVDI Blog

follow us on

ChangeLog for Agent 2.2.28

We’ve just released version 2.2.28 of flexVDI Agent. The biggest change in this version is the support for applying Desktop Policy Security Attributes, in addition to minor bug fixes.

Most relevant changes from 2.2.27:

  • FLEXVDI-1682: Don’t disable PS/2 keyboard, even if not needed. Windows 7 hangs on reboot without it
  • FLEXVDI-1852: By default, disable physical disk monitor
  • FLEXVDI-1865: Implement support for applying Desktop Policy Security Attributes

You can update to the latest Agent version, by running flexvdi-config and selecting Update.

ChangeLog for Manager 2.2.25

We’ve just released version 2.2.25 of flexVDI Manager. The biggest change in this version is the addition of Security Attributes as an extension of Desktop Policy. This allows you to selectively disable some features (USB redirection, Copy&Paste, Power Events…) on your VDI Desktops, to increase the security and isolation of every Guest.

Most relevant changes from 2.2.22:

    • FLEXVDI-1520: Add a new CPU emulation mode (AMD Opteron_G6)
    • FLEXVDI-1523: Allow to choose between PS/2 and USB keyboard mode
    • FLEXVDI-1827: Detect when an Active Directory account password has expired, and let it login to change password
    • FLEXVDI-1865: Implement support for Security Attributes on Desktop Policy

You can update to the latest Manager version, by running flexvdi-config and selecting Manager->Upgrade.

Buggy transparency effect in windows 7 taskbar

Transparency, taskbar, and high CPU usage

Lately I have been using flexVDIClient full time, and I have noticed that the fan in my PC turned into high speed frequently, due to CPU usage. So I investigated the issue, expecting I could find a way to optimize the program. What I found was quite unexpected, though.

First I will describe my setup: my computer is a Windows 7 laptop with a 1366×768 screen, and an additional 1920×1080 monitor in the right side. GPU is an Intel HD Graphics 4000, and the processor is an Intel i5.

My favorite layout is using the full big screen in the right side for a flexVDIClient connected to the console of one of my VM´s, and the small one for messaging, email… The windows taskbar is in the bottom of the left screen, where I can see the notifications.

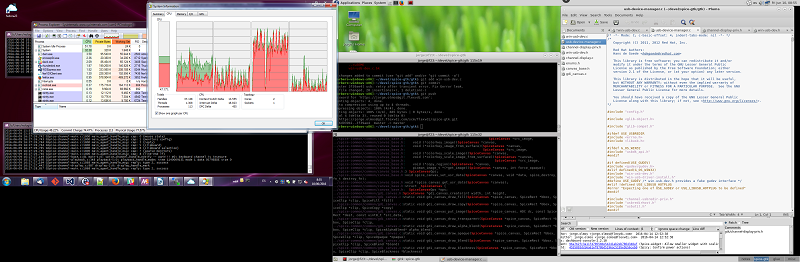
My desktop looks like this:

desktop-1

First Observations:

Initially I found that when flexVDIClient was full screen, the global cpu usage (4 cpu threads) was around 45%, with “System“ as the main CPU consumer. As soon as I closed flexVDIClient, the cpu felt down to 14%, so it looked like  flexVDIClient was the problem. Then I started playing with it.

flexVDIClient´s main task is showing images of the remote console of a virtual machine, so the amount of computations per second it has to do depends on the amount of pixels it has to move to the local display. So my first tests involved resizing the client: when I made flexVDIClient only slightly smaller than the full screen, CPU usage went down to 20%, which looked quite good. Maybe it wasn´t flexVDIClient´s fault after all.

Window positioning seems to be the key

After changing the windows size, without affecting too much to CPU usage, I had to try something else. Then I started moving the window, and I noticed the following:

Let “x” be the distance (in pixels) from the left border of the big screen to the left border of flexVDIClient, with negative values indicating that part of the window is in the left screen:

x (windows position)

Total CPU use

-100, -4, -2, 0, 1, 2

45%

3, 4, 5

35%

> 6

15-18%

What?!

When flexVDIClient window is “close” to the left screen, up to 5 pixels away, CPU usage (by the “System” process) is high. But if all the window is inside the left screen, CPU usage is low again.

Taskbar transparency

I went on testing possible factors.
I found that it was not window position itself, but window position relative to Windows taskbar what caused the problem. If I moved the taskbar to the left side or to the top of the left screen, so that the window was not behind the taskbar, the high CPU usage disappeared.
But it is not the full taskbar what caused the problem. Just the “show desktop button” in the right side of the taskbar. And not even the whole button: the bottom part of this button does not present this effect. But a small area to the right (remember those 5 pixels in the table?) and to the left of this button does.

And if I put the big monitor with flexVDIClient left to the small screen with the taskbar, then CPU usage is high when flexVDIClient is next to the “Start button”. Go figure.
Transparency must be present too. If I disable transparency, CPU usage goes down.

Conclusions:

There seems to be a bug in Windows 7 when applying transparency around the left and right borders of the taskbar, at least on my machine. But there is not much I can do about it.

In general terms, transparency effects can cost a lot of CPU. I have seen more than 20% of my i5 continuously dedicated to transparency during these tests. If you want performance, disabling visual effects can give the machine a noticeable amount of extra power. Disabling “Use visual styles on windows and buttons”  makes the trick too, as it does disabling “Visual Glass style”, or any other option in windows that removes transparency. You can find several of them under “Visual effects configuration”.

In the end I came up with a workaround. Now my Desktop is arranged like this:

desktop-2

Now the taskbar (bottom of the left screen) is below the right screen. So its sides do not “interfere” with the windows in the right screen, and CPU usage is normal again.

Cómo montar un cluster de flexVDI con DRBD (sin almacenamiento compartido)

flexvdi+drbd
Habitualmente, para montar un cluster de flexVDI, es necesario disponer de un almacenamiento compartido con disco directo (una SAN FC o SAS).

Este almacenamiento compartido se emplea para almacenar la imagen de flexVDI Manager (el orquestador de la plataforma), las plantillas de escritorio y los diferenciales de los escritorio no volátiles.

De los tres elementos mencionados, el único que genera una carga de disco significativa es el último, los diferenciales no volátiles (las plantillas de escritorio, generalmente, se encuentran cacheadas en memoria del Host, gracias al sistema de caché de flexVDI). Por tanto, si estamos pensando en montar un sistema de VDI donde la mayor parte de las escritorios van a ser de tipo volátil, podemos plantearnos prescindir del almacenamiento compartido, sustituyéndolo por un sistema de almacenamiento definido por software, como DRBD.

Continue reading “Cómo montar un cluster de flexVDI con DRBD (sin almacenamiento compartido)”

Enabling KVM virtualization for Raspberry Pi 2

As I wrote on my previous post, Enabling HYP mode on the Raspberry Pi 2, the newest machine from the Raspberry Pi Foundation features a Cortex-A7 with Virtualization Extensions, but it isn’t possible to make use of such feature out of the box.

In that article I showed that it was possible to start the kernel in HYP mode. Now, I’ll cover the rest of steps needed for enabling KVM virtualization and running your first guest OS.

Continue reading “Enabling KVM virtualization for Raspberry Pi 2”

Enabling HYP mode on the Raspberry Pi 2

The newest iteration of the wonderful machine designed by Raspberry Pi Foundation, the Raspberry Pi 2, sports a Broadcom BCM2836 SoC, with four Cortex-A7 cores. The Cortex-A7, being the little brother Cortex-A15, features the ARM Virtualization Extensions, so both Xen and KVM based virtualization should work on it.

At this point, you probably are wondering why would someone want to use virtualization on a RPi2. In addition to the usual “because you can!” answer, there’s a pretty good reason for it. Imagine you want to use the RPi2 as a media center and, at the same time, you want to run some personal services (like ownCloud or Pydio) on it. Instead of polluting the media center image, you can run an isolate, secure, virtual machine for such purpose. And, using my VEXPRESS_KVM port, you can even provide those services running NetBSD! 😉

The first step towards being able to use virtualization on the Raspberry Pi 2, is finding a way to boot the kernel in HYP mode. Let’s see how can we do that.

Continue reading “Enabling HYP mode on the Raspberry Pi 2”

Usando SpicePorts para comunicar un guest KVM con el cliente SPICE

Desde la versión 0.12.2 del servidor y la 0.15 del cliente, SPICE soporta un tipo de canal llamado SpicePort. Un puerto permite comunicación de datos arbitrarios entre un proceso en el guest y el cliente de SPICE. De esta manera, se pueden dar servicios añadidos sobre la conexión con el escritorio remoto. Por ejemplo, en flexVM estamos trabajando en servicios de transferencia de ficheros, redirección de puertos TCP/UDP y compartición de impresoras. En esta entrada mostraremos cómo se crea y utiliza un SpicePort.

Continue reading “Usando SpicePorts para comunicar un guest KVM con el cliente SPICE”

flexVM 2.1: Un año de trabajo y 158 tickets de SCRUM

Hace un año, cuando lanzamos la versión 2.0 de flexVM, vivimos un momento muy especial para nosotros. Eran tiempos de cambio, en los que habíamos decidido adoptar un nuevo enfoque, pasando de ser un componente hecho a medida para ISPs, a un producto con entidad propia orientado al público general. Este cambio de estrategia definía nuevos horizontes para el proyecto, pero también nos adentraba en un mundo nuevo y desconocido para nosotros.

La versión 2.1 es la confirmación de que el camino que emprendimos hace un año era el correcto. El producto ha madurado (y nosotros, el equipo de desarrollo, con él) y ha ganado nuevas características, alcanzando un nivel de calidad y funcionalidad que le permite competir sin complejos contra las soluciones de virtualización de servidores y escritorios más populares.

Soporte para múltiples pooles, balanceo automático y manual de recursos, integración de OpenVirtualSwitch y la publicación de nuevos clientes para dispositivos móviles (iOS y Android) son sólo algunas de las características más destacadas que se han implementado a través de los 158 tickets de SCRUM resueltos para esta versión.

Y, por supuesto, esto no se acaba aquí. Ya estamos trabajando en la versión 2.2, que traerá mejoras especialmente en las extensiones VDI, y que esperamos liberar en Febrero de 2015, inaugurando un nuevo modelo de lanzamiento de versiones, basado en ciclos de desarrollo más cortos.

Estamos convencidos que 2015 será un año muy interesante para nosotros, así como para nuestros clientes y partners. Muchas gracias a todos los que lo habéis hecho posible.

Enabling KVM virtualization on ARM (Allwinner A20)

Some time ago, ARM Holdings presented the new virtualization extensions for its processor architecture, which are now present on some models of the Cortex family, like the Cortex-A7 and Cortex-A15. Though it’s a quite recent technology, both KVM and Xen hypervisors already support such extensions, allowing to run virtualized Guests in the same way you can already do on x86.

It’s true that current SoCs (System-on-Chip) and development boards doesn’t provide a number of cores and RAM memory that invite to run a significant number of Guests on them, but these are the first steps towards stabilization of ARM virtualization, paving the way for the future server-oriented ARM processors. On the other hand, this is also an interesting option for running alternative operating systems (like the *BSD family) on ARM hardware, without dealing with the extremely heterogeneous nature of it.

In this guide, where going to see how you can enable KVM virtualization on the Olinuxino-A20-MICRO development board.

Continue reading “Enabling KVM virtualization on ARM (Allwinner A20)”